
Please note that some of the links on this site are affiliate links and we earn from qualifying purchases. This does not cost you anything extra, but it helps us keep the lights on. Thank you for your support!
Maintaining a firearm is a crucial aspect of ensuring its longevity, reliability, and safe operation. The Smith & Wesson M&P Shield 45 M2.0 Performance Center, a widely respected firearm known for its precision and performance, is no exception. Regular cleaning with proper lubrication and maintenance play a vital role in preserving the firearm’s functionality and preventing potential malfunctions or wear and tear that could occur over time. Proper care also enhances the firearm’s accuracy, ensuring it performs at its optimal level each time it is used.
In this guide we will aim to impart you with essential insights into the maintenance process, spanning from field stripping to reassembly while including valuable tips to aid the maintenance process. Whether you’re embarking on maintaining your firearm or seeking the process before a future purchase, this guide aims to be a reliable and educational source while following the manufacturers manual, ensuring that your Performance Center M&P 45 Shield M2.0 remains in peak condition, ready to perform when called upon.
As you navigate through the following sections, you’ll uncover practical, hands-on advice and answers to frequently asked questions, crafting a holistic approach to maintaining the Smith & Wesson Performance Center M&P 45 Shield M2.0.
Tools/Supplies Needed
Before we embark on the journey of field stripping, cleaning, and lubricating your Smith & Wesson Performance Center M&P 45 Shield M2.0, ensuring we have all the correct materials on hand is paramount. Not only does this streamline the process, but it also ensures that we can navigate through each step with efficiency and precision. Let’s jump right into the materials that we will be using in maintaining the prime condition of our Performance Center M&P 45 Shield M2.0:

- Shooters Lube Gun Oil: An essential lubricant that ensures smooth operation and protects against wear and corrosion.
- Shooters Lube Cleaner: A reliable cleaner is vital for removing buildup, ensuring each component remains in pristine condition.
- Hoppe’s 9 Bore Snake for .45 ACP: An effective tool that simplifies the process of cleaning the barrel, ensuring no residue is left behind.
- Hoppe’s 9 Cleaning Patches: Ideal for applying cleaners, oils and wiping away any excess debris, these patches play a crucial role in maintaining a clean firearm.
- Q-Tips: The perfect tool for reaching into those tight spaces, ensuring every nook and cranny is free from buildup and adequately lubricated.
- Cleaning Mat: Providing a protective surface for your firearm and workspace, a cleaning mat ensures no oil or cleaner damages your working area.
- Diamond Grip Gloves: Protecting your skin from direct contact with cleaners and oils, these gloves ensure a clean and safe maintenance process.
- Toothbrush: A handy tool for scrubbing away stubborn residues and accessing challenging areas, ensuring your firearm is thoroughly cleaned.
Now that we have all the materials laid out we can ensure each step can be executed with precision, maintaining the optimal performance and longevity of our Smith & Wesson M&P 45 Shield M2.0.
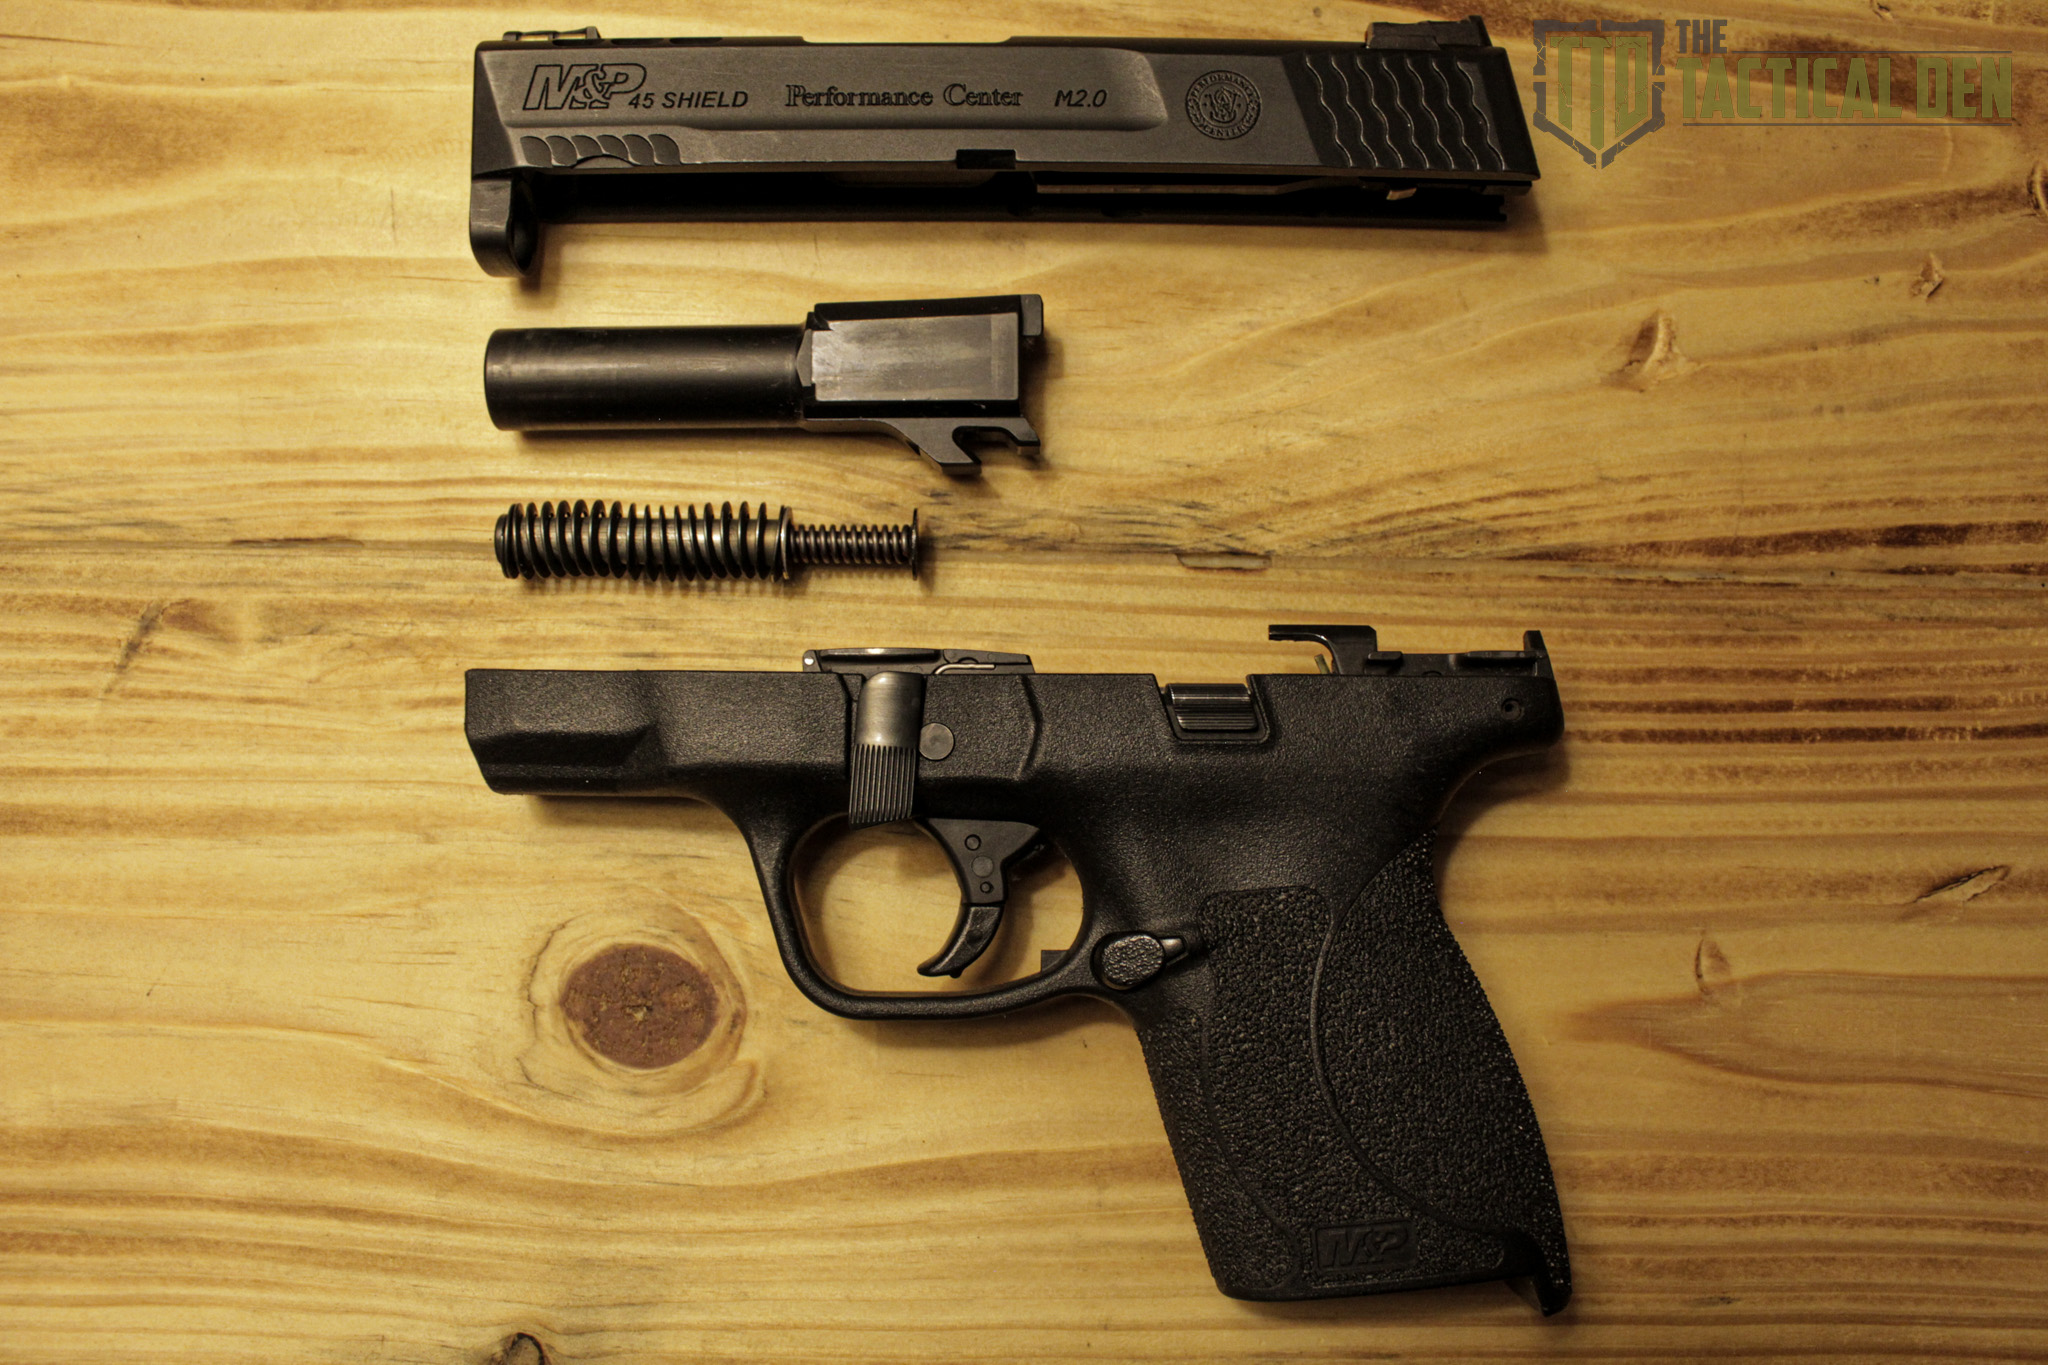
Field Stripping the Smith & Wesson M&P 45 Shield M2.0 Performance Center
Maintaining your Smith & Wesson M&P 45 Shield M2.0 Performance Center begins with understanding and implementing safe disassembly procedures and practices. Let’s proceed with a step-by-step guide for field stripping, while strictly adhering to the warnings and instructions provided by the manufacturer.
Safety Warnings
Your safety and the safety of those around you is paramount. Always be cautious when handling a firearm and safety should always be number 1 priority, be cautious of the following warnings:
- WARNING: Always ensure the muzzle is directed in a safe direction.
- WARNING: Verify the firearm is completely unloaded prior to any inspection, disassembly, or assembly.
- WARNING: Strictly adhere to the field stripping instructions. Avoid modifications and alterations to the parts.
- WARNING: Employ safety glasses during the assembly and disassembly of your firearm.
Unloading and Magazine Removal
Begin with a focus on safety. Point the pistol in a safe direction, keeping your finger off the trigger and outside the trigger guard. Depress the magazine release and remove the magazine. With the slide in the closed position, draw the slide rearward to eject any chambered round clearing the pistol

Visually Inspecting the Chamber is Clear
Grasp the slide’s serrated sides from the rear with your thumb and fingers. Draw the slide fully rearward and lock the slide open by pressing upward on the slide stop and allowing the slide to move slightly forward to rest the slide on the stop. Visually confirm the chamber is empty and clear.

Takedown Lever and Slide Removal
With the slide locked in its rear most position, rotate the takedown lever 90 degrees clockwise. Slightly pull the slide rearward to disengage the slide stop and release the slide forward. (Be extra careful with this next step and the firearm MUST be unloaded.) With the muzzle pointed in a safe direction fully depress the trigger which will allow the slide to be removed from the frame by sliding it forward. Be cautious of the recoil spring and guide rod assembly ensuring it doesn’t fall out.

Removing the Recoil Spring and Barrel
With the slide flipped over, remove the recoil spring assembly by compressing the rear of the spring forward slightly and lifting it up and out from the groove in the barrel lug. Lift the spring out of the slide and set it aside. To remove the barrel, grasp the barrel lug, lifting it upwards and then rearwards .


Final Reminders
- WARNING: Never modify, alter, or replace any firearm parts unless performed by a qualified gunsmith using authentic Smith & Wesson parts. Non-compliance may lead to malfunction and serious injury.
- WARNING: Refrain from disassembling your handgun beyond the field stripping process outlined here. Do not manipulate any internal components beyond the instructions as it may affect reliability, functioning, and safety.

With these steps completed, your M&P 45 Shield M2.0 is now field stripped and ready for the cleaning and lubrication process. Always prioritize safety and follow guidelines meticulously to ensure secure and effective firearm maintenance.
Cleaning and Lubricating the M&P 45 Shield M2.0 Performance Center
A meticulous cleaning and lubricating routine is vital for the maintenance and smooth operation of your M&P 45 Shield M2.0. The subsequent steps, organized by firearm components, provide a structured approach to maintaining each crucial part of your firearm.
Here are 7 key areas to focus on recommended by Smith & Wesson to ensure it’s is properly cleaned and lubricated along with our routine process.


Cleaning and Lubricating the Barrel
First we will begin with the barrel. Apply the cleaner to the bore and exterior of the barrel. Allow the cleaner to soak and penetrate for a minute or so, loosening any residue and buildup. Next we will grab the Hoppes 9 Bore Snake for .45 ACP. Inserting from the chamber end of the barrel pulling it through several times making sure all cleaner and debris is removed from the bore.

Now moving to the exterior of the barrel, using a cleaning patch wipe away all debris and cleaner from the exterior of the barrel.

With the barrel clean we can now focus on the lubrication process, focusing on the two key areas pictured. Applying a drop of oil to each of these areas and spreading out evenly leaving a nice thin coat of oil on the exterior. Now if you are planning on storing for a long period of time (which I am not) you can apply some oil to a cleaning patch and pass it through the bore of the barrel leaving behind a thin and even coat of oil inside the bore.
Cleaning and Lubricating the Guide Rod Assembly
Moving onto the guide rod assembly, start by spraying the assembly down with your cleaner allowing a few minutes to break down and debris and build up. Next using a cleaning patch wipe the assembly down removing all debris and cleaner.

Now that we have a clean guide rod assembly apply a small amount of oil to a cleaning patch and wipe the assembly down ensuring to leave an even and thin layer of oil. This is vital to prevent excessive accumulation of oil, which might attract debris.

Cleaning and Lubrication of the Slide
Next we’ll focus on cleaning the slide using a combination of Q-tips, cleaning patches, and a toothbrush. Apply the cleaner to the entire slide. Pay close attention to all crevices and surfaces. Thoroughly scrub to remove any residue and left over cleaner. (Tip: use a toothbrush to help clean the grooves in the serrations on the side of the slide)

With the slide clean and free of any debris it’s time to apply the oil, particularly focusing on the slide rails and other moving components of the slide. Be sure to wipe away any excess oil and to not

Cleaning and Lubricating the Frame
Now it’s time to clean the frame utilizing Q-tips and patches with cleaner. Coat the frame with cleaner make sure to hit all the nooks and cranny. Using your qtips and patches wipe away all the cleaner removing all debris and residue. Be sure to focus on the key area pictured that Smith & Wesson highlighted. Reapply as needed.

Now that the frame is clean let’s get to lubricating. There are 5 areas on the frame that we need to focus on, those are highlight in the picture below. These include the slide rails on the locking block and the sear along with the tab on the trigger bar. Apply a drop of oil to each of these areas and spread evenly. I personally also like to hit the slide stop and any other moving parts. Be sure to remove all extra oil and to not over lubricate which can result in build up.
Cleaning and Maintaining the Magazines
Magazines should never be neglected. Apply the cleaner to a patch, wipe down each magazine removing any debris.

Using a clean patch apply a small amount of oil and wipe down the exterior of the magazine. Be sure to leave behind a very thin even coat of oil to protect against corrosion and ensure smooth functionality.

Reassembling the M&P Shield 45 M2.0 Performance Center
In proceeding with the reassembly of the M&P Shield 45 M2.0 Performance Center, attention to detail and strict adherence to the instructions are paramount to safeguarding both the user and the integrity of the firearm.
- WARNING: ALWAYS ADHERE STRICTLY TO THE REASSEMBLY INSTRUCTIONS. NEVER ATTEMPT TO MODIFY OR ALTER THE PARTS OF YOUR PISTOL.
- WARNING: ENSURE TO WEAR SAFETY GLASSES DURING BOTH ASSEMBLY AND DISASSEMBLY TO PROTECT YOUR EYES.
Installing the Barrel and Recoil Spring Assembly:
With the slide flipped upside down, start by inserting the muzzle end of the barrel into the slide. Be sure the barrel lug is facing up the chamber end clears the breach face. Next install the recoil spring assembly into its recessed grove on the slide. Then using your finger slightly compress the spring to insert it into the notch on the barrel lug.


Reuniting the Slide to the Frame:
Now we need to align the slide rails with the rails on the frame. Once aligned guide the slide entirely rearward to its stopping point. Then engage the slide stop locking the slide in its rear most position.

Engaging the Takedown Lever:
While keeping the slide locked rearward. Rotate the takedown lever 90 degrees counter-clockwise to align it parallel with the frame.

Disengaging the Slide Stop:
Allow the slide to move rearward, disengaging the slide stop, and then permit the slide to proceed fully forward.

Lastly grab a rag or microfiber and wipe away any excess oil from the M&P Shield 45 M2.0 Performance Center. Now its time for a functions check.

Functions Check for the M&P Shield 45 M2.0 Performance Center
Function Check:
Upon reassembling your M&P Shield, it’s imperative to perform a functions check to ensure the firearm is operating correctly and safely.
- Visual Inspection: Ensure no ammunition is in the chamber or magazine. Visually and physically inspect to confirm.
- Slide Operation: Cycle the slide several times, paying attention to its smoothness and checking for any unusual sounds or friction.
- Trigger Check: Point the firearm in a safe direction. Depress the trigger; a click should be audible and the feel should be crisp. Cycle the slide again and ensure the trigger resets properly.
- Safety Check: If your model has a manual safety, ensure it moves between positions smoothly and locks the trigger when engaged.
Conclusion:
Regular maintenance, which includes field-stripping, cleaning, lubrication, and reassembly, assures the longevity and reliable function of your M&P Shield 45 M2.0 Performance Center. Understanding and adhering to the detailed steps provided in each section fortify safe practices and proficient handling of your firearm.

Frequently Asked Questions (FAQ)
Q1: How often should I clean my M&P Shield 45 M2.0 Performance Center?
A1: Regular cleaning is recommended after each use. Even if the pistol has not been fired, frequent inspection and cleaning are advised to ensure optimal performance and longevity.
Q2: Can I use any type of gun oil for lubricating my M&P Shield?
A2: While various gun oils might work, it’s recommended to utilize oils specifically designed for firearms to guarantee maximal protection and functionality.
Q3: Is it necessary to perform a function check after reassembly?
A3: Absolutely. Performing a function check ensures that the firearm has been reassembled correctly and will operate safely and efficiently.
Q4: How do I store my M&P Shield when it is not in use?
A4: Always store your firearm unloaded, secured in a safe and separate from ammunition. Ensuring it is inaccessible to unauthorized or unqualified individuals.
Q5: What should I do if I encounter an issue during the field stripping or reassembly process?
A5: If you encounter any issues or uncertainties during any phase of disassembly or reassembly, consult the user manual, seek advice from a qualified gunsmith, or contact Smith & Wesson’s customer service for assistance.
This information should serve as a thorough guide through the entire process from field-stripping to reassembly, aiming to facilitate a safe and effective experience for users of the M&P Shield 45 M2.0 Performance Center. Always adhere strictly to guidelines and safety measures while handling firearms.


Leave a Reply