How to Field Strip, Clean, and Lubricate the Beretta M9A1
Published by
Danny Lux
on
Please note that some of the links on this site are affiliate links and we earn from qualifying purchases. This does not cost you anything extra, but it helps us keep the lights on. Thank you for your support!
Owning a Beretta M9A1 comes with the responsibility of regular upkeep to maintain its functionality and safety. Proper maintenance not only ensures that your firearm operates correctly, but it can also extend its lifespan, providing you with a reliable tool for a much longer period.
As we dive into the procedures of field stripping, cleaning, and lubricating your Beretta M9A1, remember to always prioritize safety. Ensure the weapon is unloaded before initiating the field stripping process, and always handle your Beretta M9A1 with the caution it demands as a firearm. Safety is always our #1 Priority.
In this guide, we will walk you through each step of the maintenance process while follow instructions that can be found in the owners manual provided with the M9A1 from Beretta, empowering you with the knowledge to take proper care of your Beretta M9A1. To view our full in-depth review on the Beretta M9A1 Click Here!
Tools and Supplies You Will Need
Before we jumping head first into the process of field stripping, cleaning, and lubricating your Beretta M9A1, it’s vital to gather all the necessary supplies. Here, I share my lineup of tools and products that I will be using throughout this guide.
Cleaning Supplies Used
The exact products and tools I used during the FN 509 cleaning process.
Hoppe’s 9 Lubricating Gun Oil
Keeps the FN 509 running smoothly and reliably by lubricating key wear points.
So, now that we have all our supplies ready, let’s get right into the fun stuff.
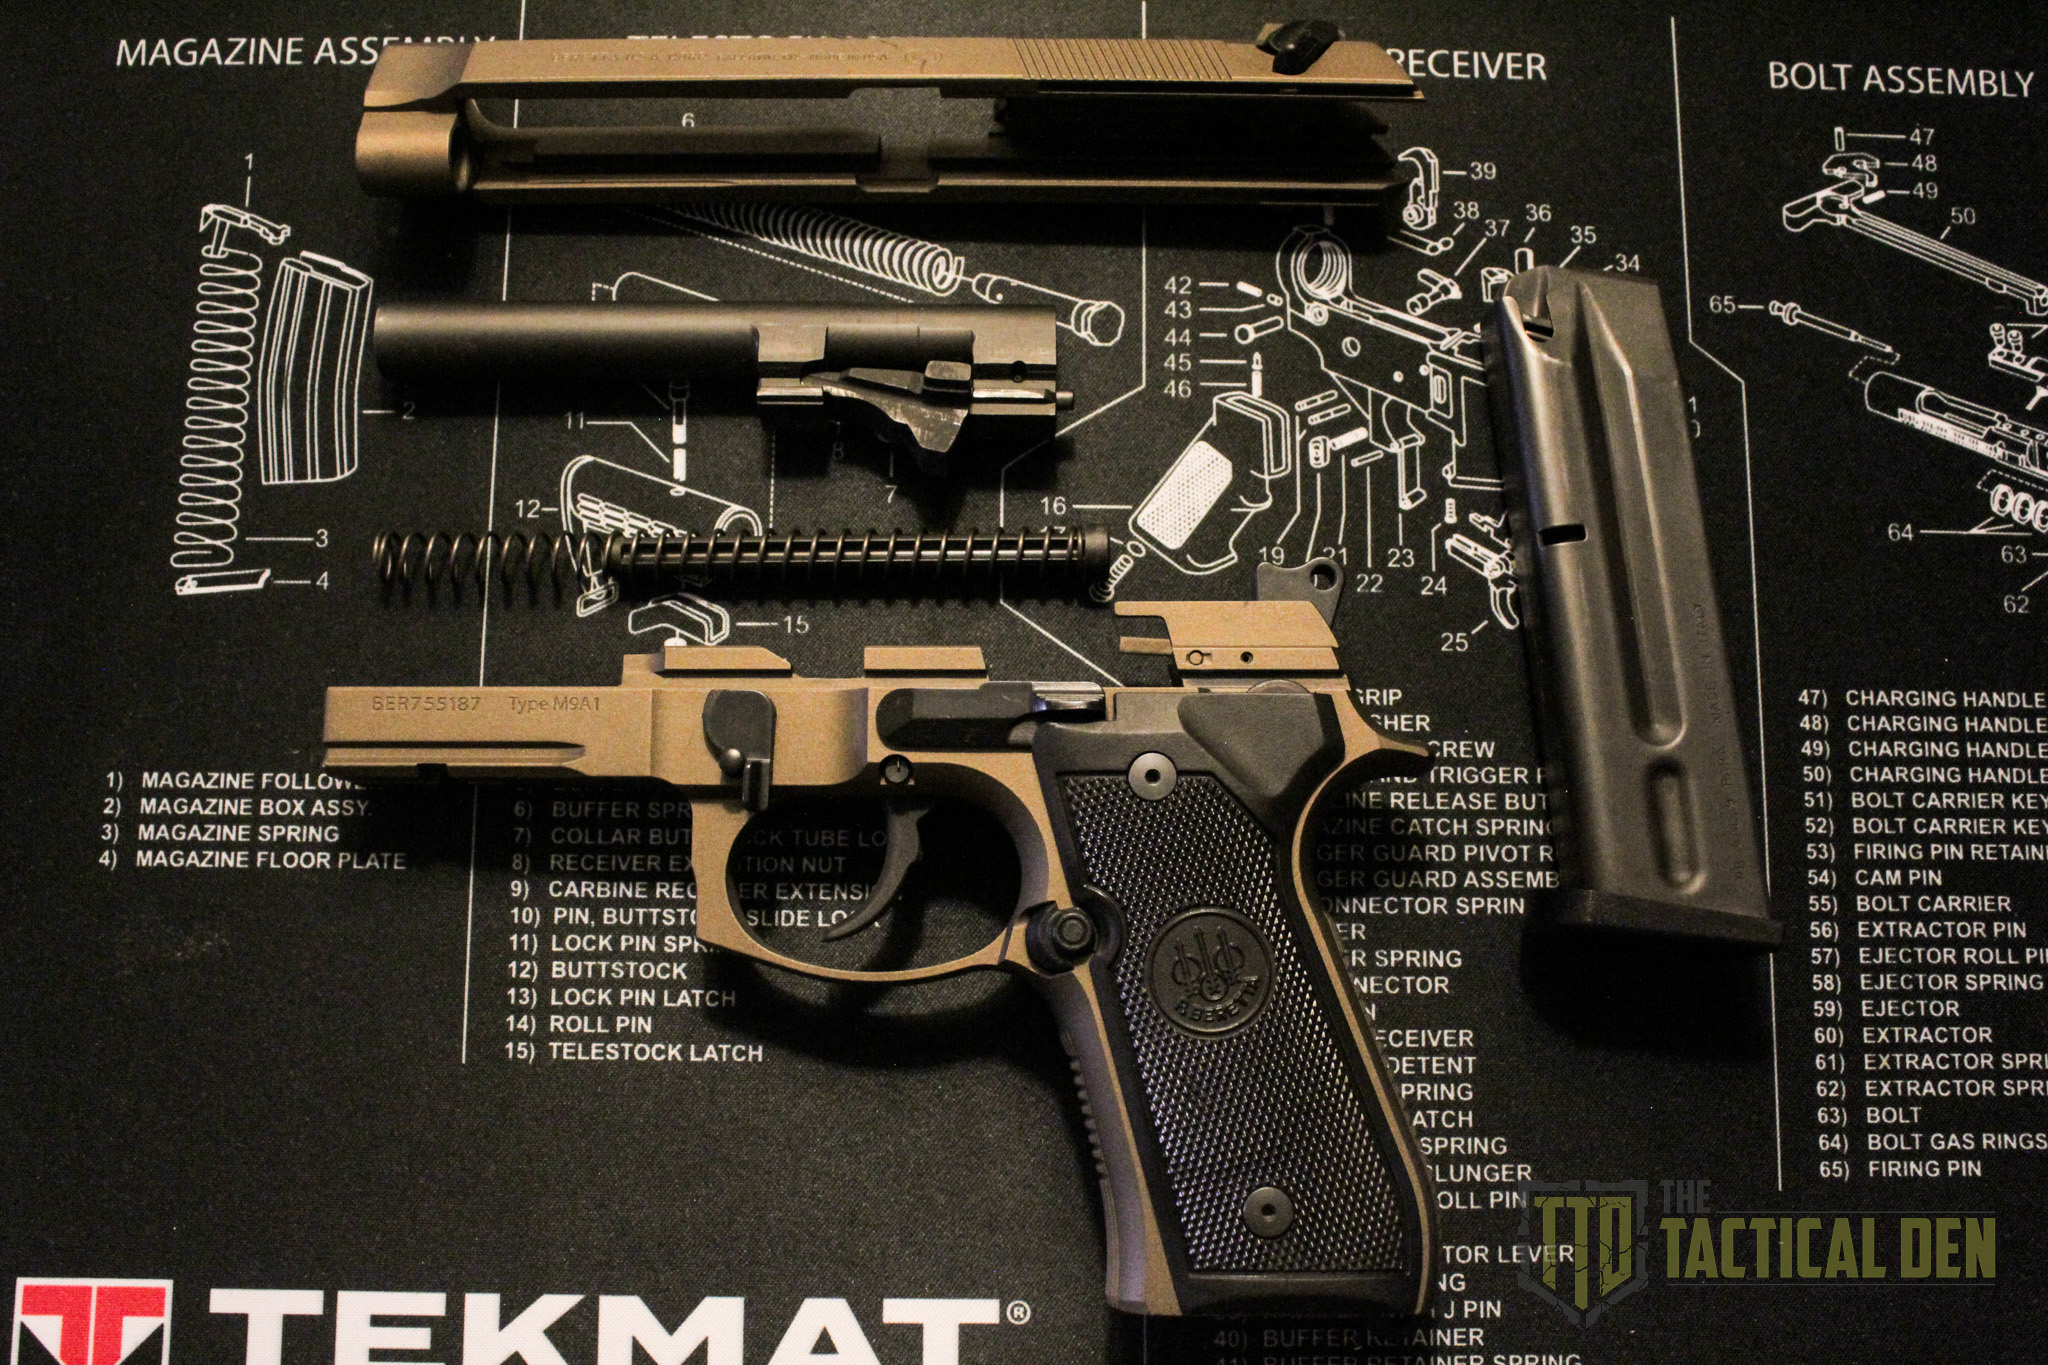
Step-by-Step Field Strip of the Beretta M9A1
Before we get started field stripping the Beretta M9A1, remember to always adhere to the instructions provided in the owner’s manual by Beretta to ensure safety and prevent any damage to the firearm. Here are a few precautions before we begin:
This pistol can be disassembled and reassembled with or without the manual safety engaged. It is the user’s responsibility to ensure the firearm is safe and the chamber is clear before working on.
Do not pull the trigger during the removal and mounting of the slide, as this can cause damage.
Clearing the Firearm: First and foremost, ensure the firearm is unloaded and safe to work on, as safety should always be your #1 priority. Manually engage the safety so that the red warning dot is covered. Then, remove the magazine and pull the slide back to its rearmost position, and locking it in place. Visually inspect the chamber to confirm it is clear and unloaded.
Disengaging the Disassembling Latch: With the safety engaged and the magazine removed, hold the pistol in your right hand with the muzzle slightly elevated. Use your left forefinger to depress the disassembling latch release button. While it’s depressed, use your thumbs to rotate the latch on the opposite side clockwise until it stops, making sure the tab pointing downwards.
Removing the Slide from the Frame: After rotating the disassembly latch so the tab is pointing down, slide the barrel/slide assembly forward in one smooth stroke to remove it from the frame. (Warning: The recoil spring guide is under pressure from the recoil spring; be cautious not to let the guide slip off the barrel lug, preventing it from “shooting off.”)
Positioning the Slide: With the barrel/slide assembly detached from the frame, turn the slide upside down.
Removing the Recoil Spring and Guide: While holding the slide in one hand, use your other hand to position your index finger on the front of the slide and your thumb on the head of the guide rod. Compress the spring just enough to disengage it from the barrel lug, then lift the guide rod head upward until it clears the barrel lug. While maintaining control of the guide rod head, gradually release the spring tension to remove the recoil spring and guide. (Caution: The recoil spring and guide are under pressure.)
Removing the Barrel: To remove the barrel/locking block unit from the slide, continue holding the slide as you did in the previous step. Grab the barrel lug from the front and the plunger from the rear, pushing the plunger forward to raise the locking block slightly, allowing it to clear the slide’s locking block shoulders. Push the barrel forward just enough for it to clear the extractor head. Now, lift the barrel to clear the breech face and remove it from the slide.
(Warning: Avoid pulling the trigger to initiate hammer fall when the pistol is field stripped.)
At this point, your Beretta M9A1 is successfully field stripped! This breakdown is sufficient to allow for an efficient and effective cleaning, ensuring you can reach all the necessary areas for an in-depth cleaning and lubrication.
Cleaning the Beretta M9A1
With the field stripping process complete, it is now time to ensure that every component of the Beretta M9A1 is thoroughly cleaned. Here is my step-by-step routine, while also following Beretta’s instructions.
Cleaning the Barrel
Take your barrel and apply your cleaner to the inside using the spray nozzle, a q-tip or patch. Let it soak for a minute to break down heavy deposits or debris. Next, insert a bore snake from the chamber end of the barrel and pass it through a few times until the bore is clean and free of debris and cleaner. Finish by passing a clean patch through the barrel to ensure all cleaner and debris are removed.
Apply cleaner to the locking block and clean the exterior of the barrel and the locking block of any debris or cleaner using a q-tip or patch.
Cleaning the Slide
Apply cleaner to the entire slide, focusing on the breach face and extractor, slide rails, underside of the breech, and the back surface around the firing pin plunger, safety, and where the hammer would be. Remove debris and cleaner from the slide using a q-tip or patch.
Cleaning the Recoil Spring and Guide
Next, we’ll tackle the recoil spring. Apply cleaner using a patch, let it soak for a few minutes, and then wipe away any debris or cleaner.
Cleaning the Frame
Clean all areas of the frame affected by gunpowder residue and debris using a soaked brush, patch, or q-tip. For hard-to-reach areas, a q-tip works well, and a toothbrush can help efficiently clean the mag well.
Cleaning the Magazines
Lastly is the magazines. Thoroughly wipe down and remove any debris using a patch lightly coated with cleaner.
Lubricating the Beretta M9A1
Ensuring proper lubrication is essential in our maintenance guide. This process guarantees seamless functioning and extended durability for your Beretta M9A1. Without further ado, let’s get to lubing!
Lubricating the Barrel
Starting with the barrel. Lightly oil the chamber and barrel by passing a patch very lightly moistened with gun oil through the chamber.
Apply oil to the exterior of the barrel and the locking block, focusing on the rails and ensuring that the front and rear hinge surfaces of the block have an even, thin coat of oil.
Place a drop of oil around the locking block plunger, ensuring it moves freely.
Lubricating the Slide
Place a few drops of oil on the slide rail, holding it upright to allow the oil to reach the other side, aiding the process with a q-tip if necessary.
Lightly oil the underside of the breech.
Push the extractor outward using your thumb, apply a few drops of oil alongside it, and move it to ensure internal penetration.
From underneath, apply a drop of oil around the firing pin catch, pushing and releasing it to ensure ease of movement and oil penetration.
Lastly, apply a few drops of oil on each side of the safety/decocking lever, safety bolt and firing pin unit from the rear of the breech. Move the lever repeatedly to ensure oil penetration and smooth operation.
Now, wipe away any excess oil on the slide using a patch.
(NOTE: To test the operations of the firing pin unit and catch by placing the safety “OFF” and using a punch to push the firing pin unit forward. Ensure the firing pin does not protrude the breech face.Hold the firing pin catch fully up from below the slide breech and push the firing pin unit forward to ensure it protrudes the breech face and moves freely back and forth.)
Lubricating the Recoil Spring and Guide
Lightly oil the guide rod and recoil spring using a patch. Simple.
Lubricating the Frame
Lightly oil the frame’s rails and all moving parts, paying close attention to the disassembling latch, magazine release, slide stop, trigger system, hammer, sear, and levers in front of the hammer.
Lubricating the Magazines
Finally, apply a very light and even coat of oil to the exterior of the magazines using a patch.
Reassembling the Beretta M9A1
After thoroughly cleaning and lubricating your Beretta M9A1, IT’S TIMEEE! to reassemble the firearm.
Engage the Safety: Ensure the safety is engaged, indicated by the red dot being covered.
Installing the Barrel: With the slide upside down, hold the barrel by its lug and insert it into the slide through the muzzle hole just enough to clear the breech face and fall in place. Ensure the locking block lugs are fully seated in the slide’s locking lug shoulder slot.
Installing the Recoil Spring and Guide: While continuing to have the slide in an upside-down position and ensuring the barrel is properly seated, it’s time to install the recoil spring and guide. (Note: The recoil spring and guide will be under spring pressure while installing.)
Holding the spring and guide parallel to the barrel, insert the spring into the recess on the slide. Use your thumb and leverage from the slide to compress the recoil spring, guiding the guide head onto the half-round cutout on the locking block. Ensure it is fully seated before releasing your grip. (Warning: If the guide head is not fully seated, you cannot reinstall the slide onto the frame.)
Reuniting the Slide to the Frame: Ensure the disassembling latch tab is facing down and the hammer is fully lowered. Align the slide rails with the frame rails, then pull the slide back to its rear-most position. Flip the disassembling latch back up, locking the frame and slide together.
Functions Check
With the Beretta M9A1 now assembled, perform a functions check to ensure everything is working correctly:
Rack the slide multiple times to ensure free and smooth movement.
Verify the correct operation of all firearm features, including but not limited to:
Safety/decocking lever
Trigger assembly
Slide stop
Mag release
It is also good practice to check these functions with each magazine to ensure full functionality.
As we bring this comprehensive guide on field stripping, cleaning, and lubricating your Beretta M9A1 to a close, we wish to underline the critical role regular maintenance plays in ensuring the optimum functionality and lifespan of your firearm. In this concluding section, we address some pivotal aspects and answer frequent questions.
Having a maintenance routine goes beyond just cleaning post-use; it encompasses the assurance that your firearm operates flawlessly at every use. This involves:
Safety Assurance: Habitual maintenance fosters safety for both the user and those in the surrounding vicinity.
Increased Durability: Regular upkeep augments the firearm’s life, promising smooth operation for many years.
Optimized Performance: Maintaining your firearm in prime condition ensures consistent accuracy and reliability each time it’s utilized.
Recommended Cleaning Frequency for Your Beretta M9A1
Determining the ideal cleaning frequency is a common query. Though it primarily hinges on how frequently the firearm is used, here is a generally accepted guideline:
Post-Usage: It is prudent to clean the firearm after every use, particularly after discharging a substantial number of rounds.
Routine Inspections: Regardless of its usage, conducting an inspection and cleaning every 3-6 months is advisable to forestall potential issues arising from storage conditions.
FAQs
What Does Field Stripping Entail? Field stripping refers to the process of breaking down a firearm to its most basic components, a task achievable without the need for special tools.
Can I Opt for Alternative Cleaning Agents or Oils? Yes, different cleaners and oils can be utilized, provided they are crafted specifically for firearms to prevent inadvertent damage.
What Should I Do If Reassembly Proves Challenging? In case reassembling your Beretta M9A1 seems daunting, it’s recommended to consult the manual provided by the manufacturer or seek the aid of a skilled gunsmith.
Is Cleaning Mandatory Even If the Firearm Hasn’t Been Used? Yes, periodic cleaning is crucial as oils may dehydrate and dust might accumulate over time, potentially causing operational issues in the future.
Conclusion
In summation, mastering the correct protocols of field stripping, cleaning, and lubricating your Beretta M9A1 will not only augment the safety and efficacy of your firearm but also prolong its service life. It is imperative that this regimen becomes as routine to you as handling the firearm itself. To view our full in-depth review on the Beretta M9A1 Click Here!
We appreciate your time and engagement in this detailed tutorial. Always accord priority to safety in every step, and for optimum outcomes, adhere to the directives issued by the manufacturer. Wishing you safe and joyful shooting experiences!
I may earn a small part of the sale from affiliate links to any products or services on this site. You do not pay anything extra and your purchase helps support our work in bringing you more awesome guides and articles.


Leave a Reply