
Please note that some of the links on this site are affiliate links and we earn from qualifying purchases. This does not cost you anything extra, but it helps us keep the lights on. Thank you for your support!
Tackling the FN 509’s Slide Stop Challenge: My Personal Experience
When it comes to the FN 509, I’ve always been an admirer of its tactical precision. However, there was one element I felt could use some improvement: the slide stop. Having spent a good amount of time with the FN 509, I often found its slide stop to be a tad undersized. Whether during rapid reloads or when working through a malfunction, the discomfort of the small slide stop digging into my finger was palpable.
Searching for a viable solution led me down various paths, but one stood out in terms of both simplicity and cost-effectiveness: swapping out the standard slide stop with the one from the FN509 Tactical for about $40. The Tactical version, with its full-length ledge, provided that extra surface area and comfort I was craving. This minor yet impactful upgrade transformed the slide release experience from a gritty challenge to a smooth, effortless action.
For fellow FN 509 aficionados who might have encountered the same issue, I can’t recommend this modification enough. It’s not just about the improved comfort, but the efficiency and usability of the firearm. This small tweak, as I’ve detailed in my review, can make a world of difference. And as always, it’s the little details that elevate our shooting experience.
Tools Needed for the Upgrade

Before diving into the installation process, it’s crucial to ensure you have all the necessary tools on hand. A proper toolset not only makes the task easier but also helps in preventing any potential damage to your FN 509. All tools needed can be found in the Weaver Gunsmithing Tool Kit, Here’s what we used:
- Bench Block: This tool provides a stable platform, ensuring the frame stays in place while you’re working on it. It has various sized holes and slots to accommodate different parts and pins, making the task of removing and reinstalling pins much more manageable.
- Pin Punch Set: Essential for removing the trigger pin, unlock block retaining pin, and other parts. Ensure you have a set with varying sizes to match the pins you’ll be working with.
- Plastic/Brass Hammer: A dual-headed hammer, one side being plastic and the other brass, is ideal. The plastic side ensures you don’t mar or damage your firearm’s finish, while the brass side offers a bit more weight for those pins that need a little extra persuasion.
Having the right tools at your disposal not only ensures a successful installation but also keeps your firearm in top condition throughout the process.
Disassembly of the FN 509: A Comprehensive Guide
Step 1: Safety Precautions
Press the magazine release and slide out the magazine from the grip. Then, pull back the slide to visually ensure the chamber is empty. Confirm its emptiness and then release the slide to its forward position.

Step 2: Field Stripping
Before diving into the frame, the FN 509 will need to be field stripped. If you’re unfamiliar with this, check out my detailed guide on how to field strip the FN 509 here. After field stripping, set the slide, barrel, and recoil spring assembly aside.
Step 3: Trigger Pin Removal
Using a pin punch, carefully tap out the trigger pin from the opposite side of the frame.

Step 4: Take Down Lever Removal
After the trigger pin is out, wiggle and then pull the takedown lever from the frame.

Step 5: Unlock Block Retaining Pin Removal
Using a smaller pin punch, tap out the unlock block retaining pin from the frame. This one make take a few more stronger hits compared to the trigger pin.

Step 6: Unlock Block Removal
With the necessary pins removed, you can now extract the unlock block from the frame.


Step 7: Slide Stop & Spring Removal
Gently lift and remove both the slide stop and the accompanying spring from the frame.

After completing the removal steps, make sure to lay out all removed components on a mat. This facilitates an easier reassembly process. Always work methodically and with patience to maintain the integrity of your FN 509.

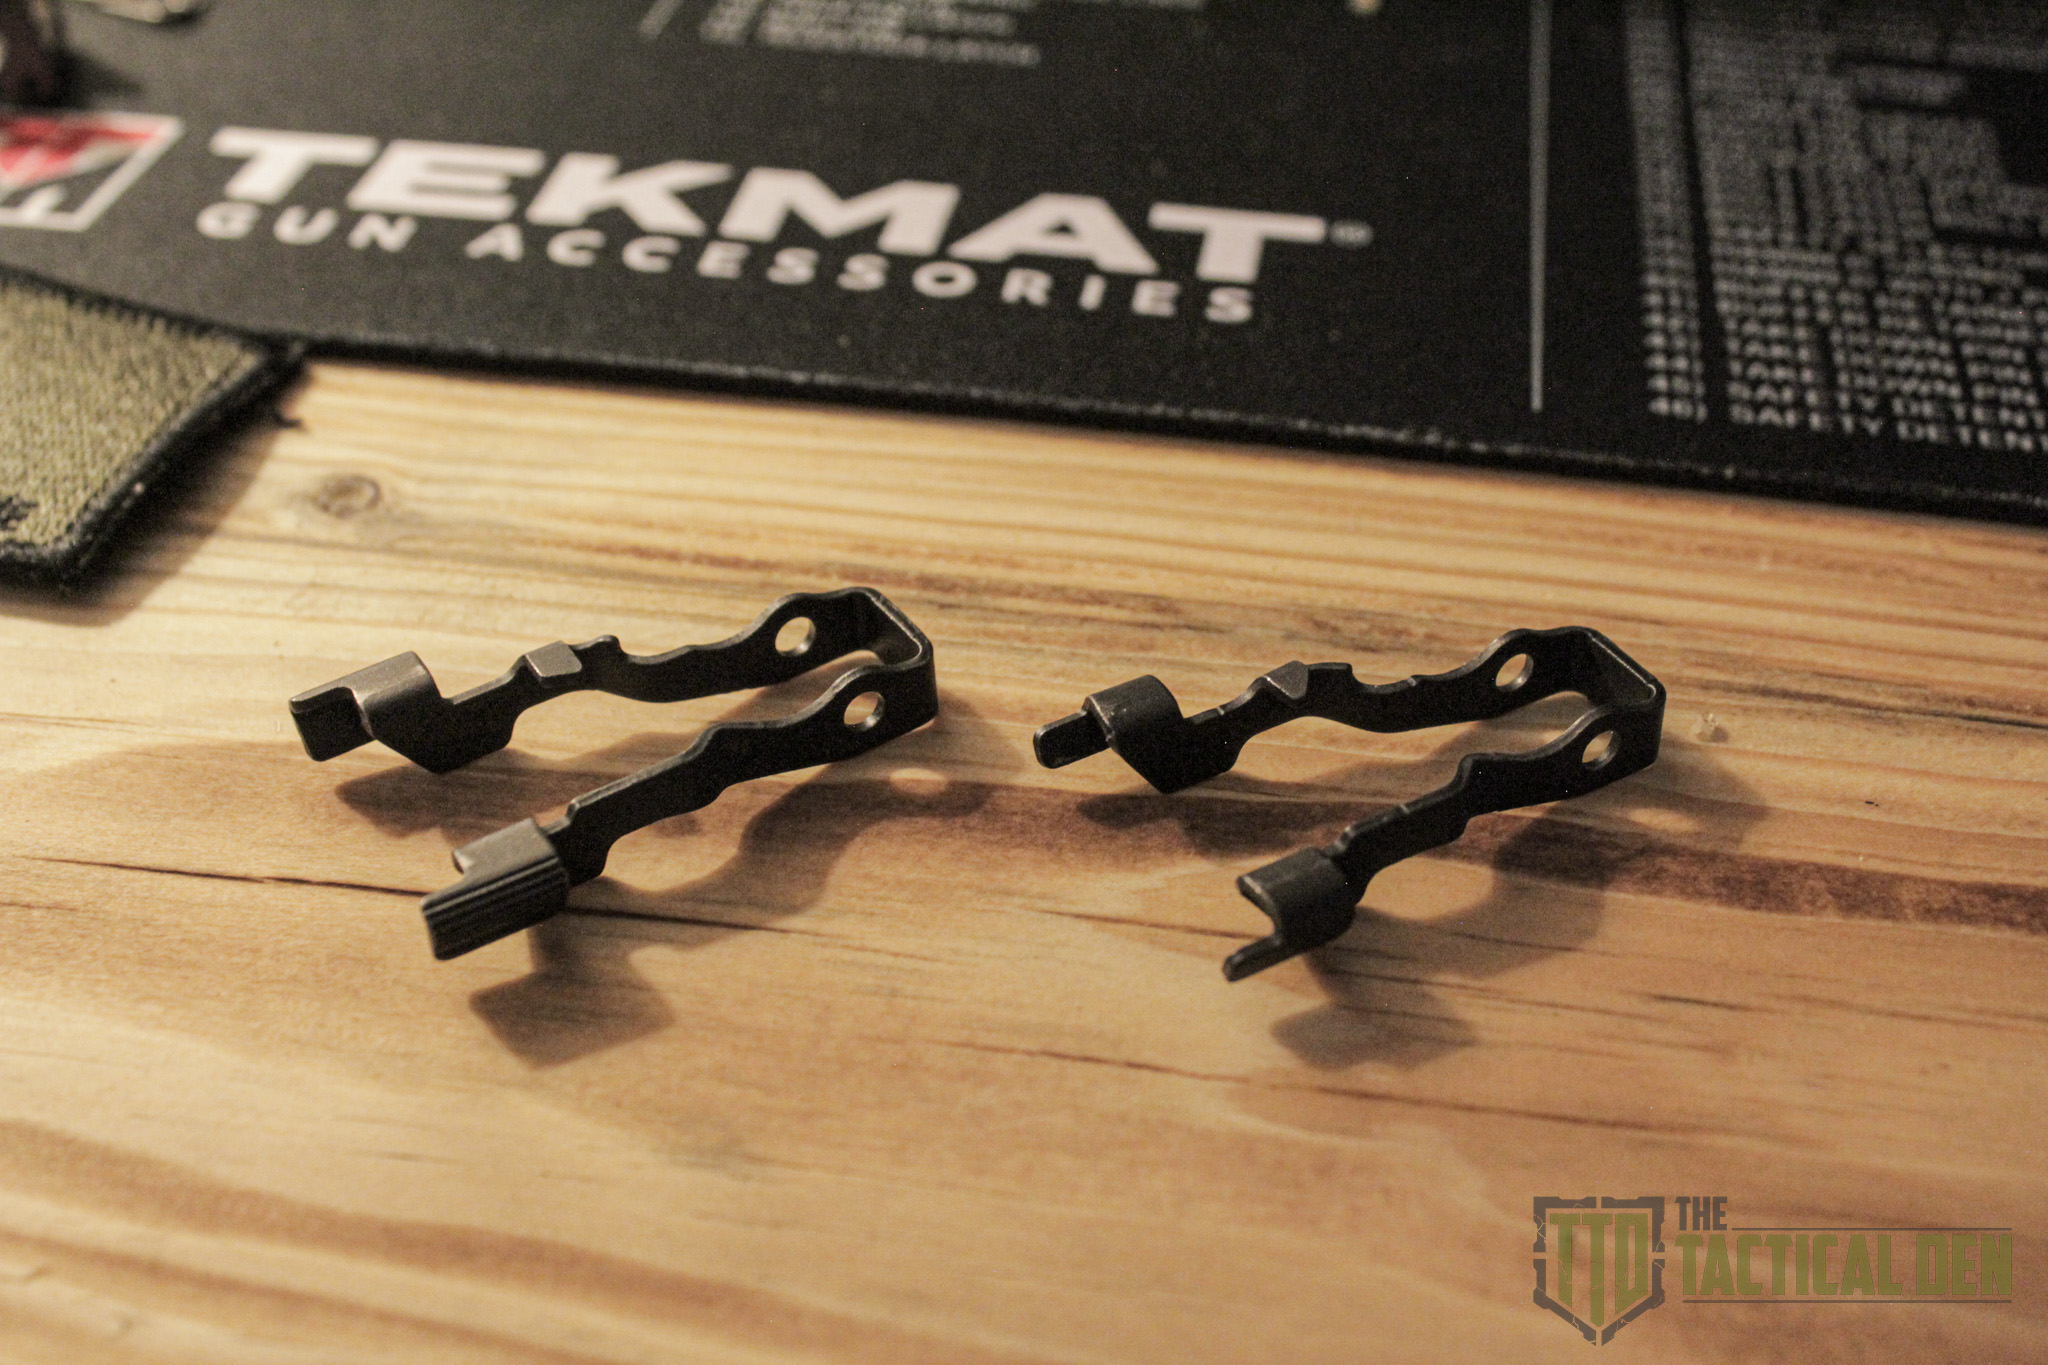
Comparing the Slide Stops: FN 509 vs. FN 509 Tactical
In the world of firearms, small nuances can make significant differences. When we look closely at the FN 509 and the FN 509 Tactical, one of the standout distinctions lies in their slide stops. A side-by-side comparison, especially when accompanied by illustrative photos, can help highlight these differences more clearly.

Slide Stop Ledge Length
One of the most noticeable differences is the length of the slide stop ledge:
- FN 509 Tactical: The slide stop ledge runs the full length of the component. This extended surface provides more area for the thumb to make contact, ensuring a more positive engagement.
- FN 509: In contrast, the slide stop on the standard FN 509 only spans about two-thirds of the total length. While this is sufficient for many users, some might find the shorter ledge less ergonomic or slightly harder to engage, especially under stressful situations or rapid manipulations.
Texture & Grip
Another distinct variation between these two slide stops lies in their texture:
- FN 509 Tactical: The slide stop features grooves on its full ledge. These grooves enhance grip, reducing the chance of a thumb slip, especially in adverse conditions. This design choice makes the slide stop on the Tactical variant much easier to press, a boon for both rapid and precise manipulations.
- FN 509: The slide stop on this model is smooth on the top half of the ledge without any grooves. This can result in a sleeker look, but functionally, it might not provide the same level of grip as the grooved counterpart on the Tactical variant.
In conclusion, while both slide stops serve their primary function well, the FN 509 Tactical’s slide stop, with its full-length ledge and added grooves, provides an enhanced user experience. For those prioritizing ergonomic enhancements and tactile features, upgrading to or choosing the Tactical variant might be a worthy consideration.
Installing the FN 509 Tactical Slide Stop: Step-by-Step Guide
With having the two slide stops compared and the FN 509 Tactical slide stop ready to be installed, let’s proceed with the reassembly of the FN 509 with the FN 509 Tactical slide stop. This process will mostly mirror the disassembly steps in reverse, ensuring a smooth reassembly.

Step 1: Installing the Slide Stop & Spring
Insert the FN 509 tactical slide stop and the slide stop spring back into the frame. Check the provided picture for the correct orientation. A punch can be handy here to help align the spring and slide stop with the trigger pin hole.

Step 2: Positioning the Unlock Block
Slide the unlock block back into the frame. Ensure that both the spring and slide stop lie inside the unlock block.

Step 3: Trigger Pin Installation
With the unlock block in place, the trigger pin can now be reinserted. It’s essential to align the slide stop, slide stop spring, unlock block, and trigger correctly. Begin by pushing the trigger pin slightly into the frame. From the opposite side, use a punch to align all the holes, simultaneously applying pressure on the trigger pin. Once aligned, the trigger pin should slide in effortlessly. Check the orientation picture to confirm you’re doing it right. If you find resistance, something might be misaligned—don’t force it.

Step 4: Installing the Take Down Lever
Before installing the take down lever, you’ll notice a part of the slide stop spring obstructing the lever hole. Use a punch or flat-head screwdriver to push this tab of the spring rearwards just enough to clear the way for the take down lever.


Step 5: Installing the Unlock Block Retaining Pin
This step requires some force, as the pin has a snug fit. Position the pin and then use a plastic hammer to tap it in. Ensure the pin is seated flush with the frame’s exterior, allowing the take down lever to move without hindrance.

Step 6: Reassembling the Slide Components
Insert the barrel back into the slide, followed by the recoil spring assembly.

Step 7: Reattaching the Slide
Position the slide back onto the frames slide rails, pulling it to its rear most position. Lock it in place using the slide stop. Flip the take down lever back to its original position and then release the slide.

Step 8: Function Check
Cycle the slide multiple times to ensure it operates smoothly. This step is crucial to ensure everything has been reassembled correctly and the FN 509 features function as intended.

And there you have it! You’ve successfully upgraded and installed a slide stop from the FN 509 Tactical onto your FN 509. In my view, this modification is a game-changer for the FN 509, and a must have upgrade, offering enhanced usability and a refined shooting experience.
Let me know in the comments below what your favorite upgrade is and what you would like to see next!


Leave a Reply