How to Field Strip, Clean and Lubricate the FN 509
Published by
Danny Lux
on
Please note that some of the links on this site are affiliate links and we earn from qualifying purchases. This does not cost you anything extra, but it helps us keep the lights on. Thank you for your support!
As someone who appreciates the reliability and performance of the FN 509, I cannot stress enough the importance of regular maintenance to ensure it operates smoothly at all times. Keeping it clean and well-lubricated not only ensures safety but also enhances its lifespan and performance.
In this detailed walkthrough, I will guide you through FN’s process of field stripping, cleaning, and lubricating your FN 509 using FN’s instructions and a personally curated set of tools. This guide aims to empower you with the knowledge and steps to maintain your firearm in top-notch condition, ensuring its optimum performance for years to come. To view our full in-depth review on the FN 509 Click Here!
Supplies Needed
Before we start with the process of field stripping, cleaning and lubricating, it is essential to have all the necessary supplies on hand. Here’s a rundown of the supplies I personally prefer to use, ensuring a clean and well-maintained FN 509:
Cleaning Supplies Used
The exact products and tools I used during the FN 509 cleaning process.
Hoppe’s 9 Lubricating Gun Oil
Keeps the FN 509 running smoothly and reliably by lubricating key wear points.
So, now that we have all our supplies ready, let’s dive into the fun stuff.
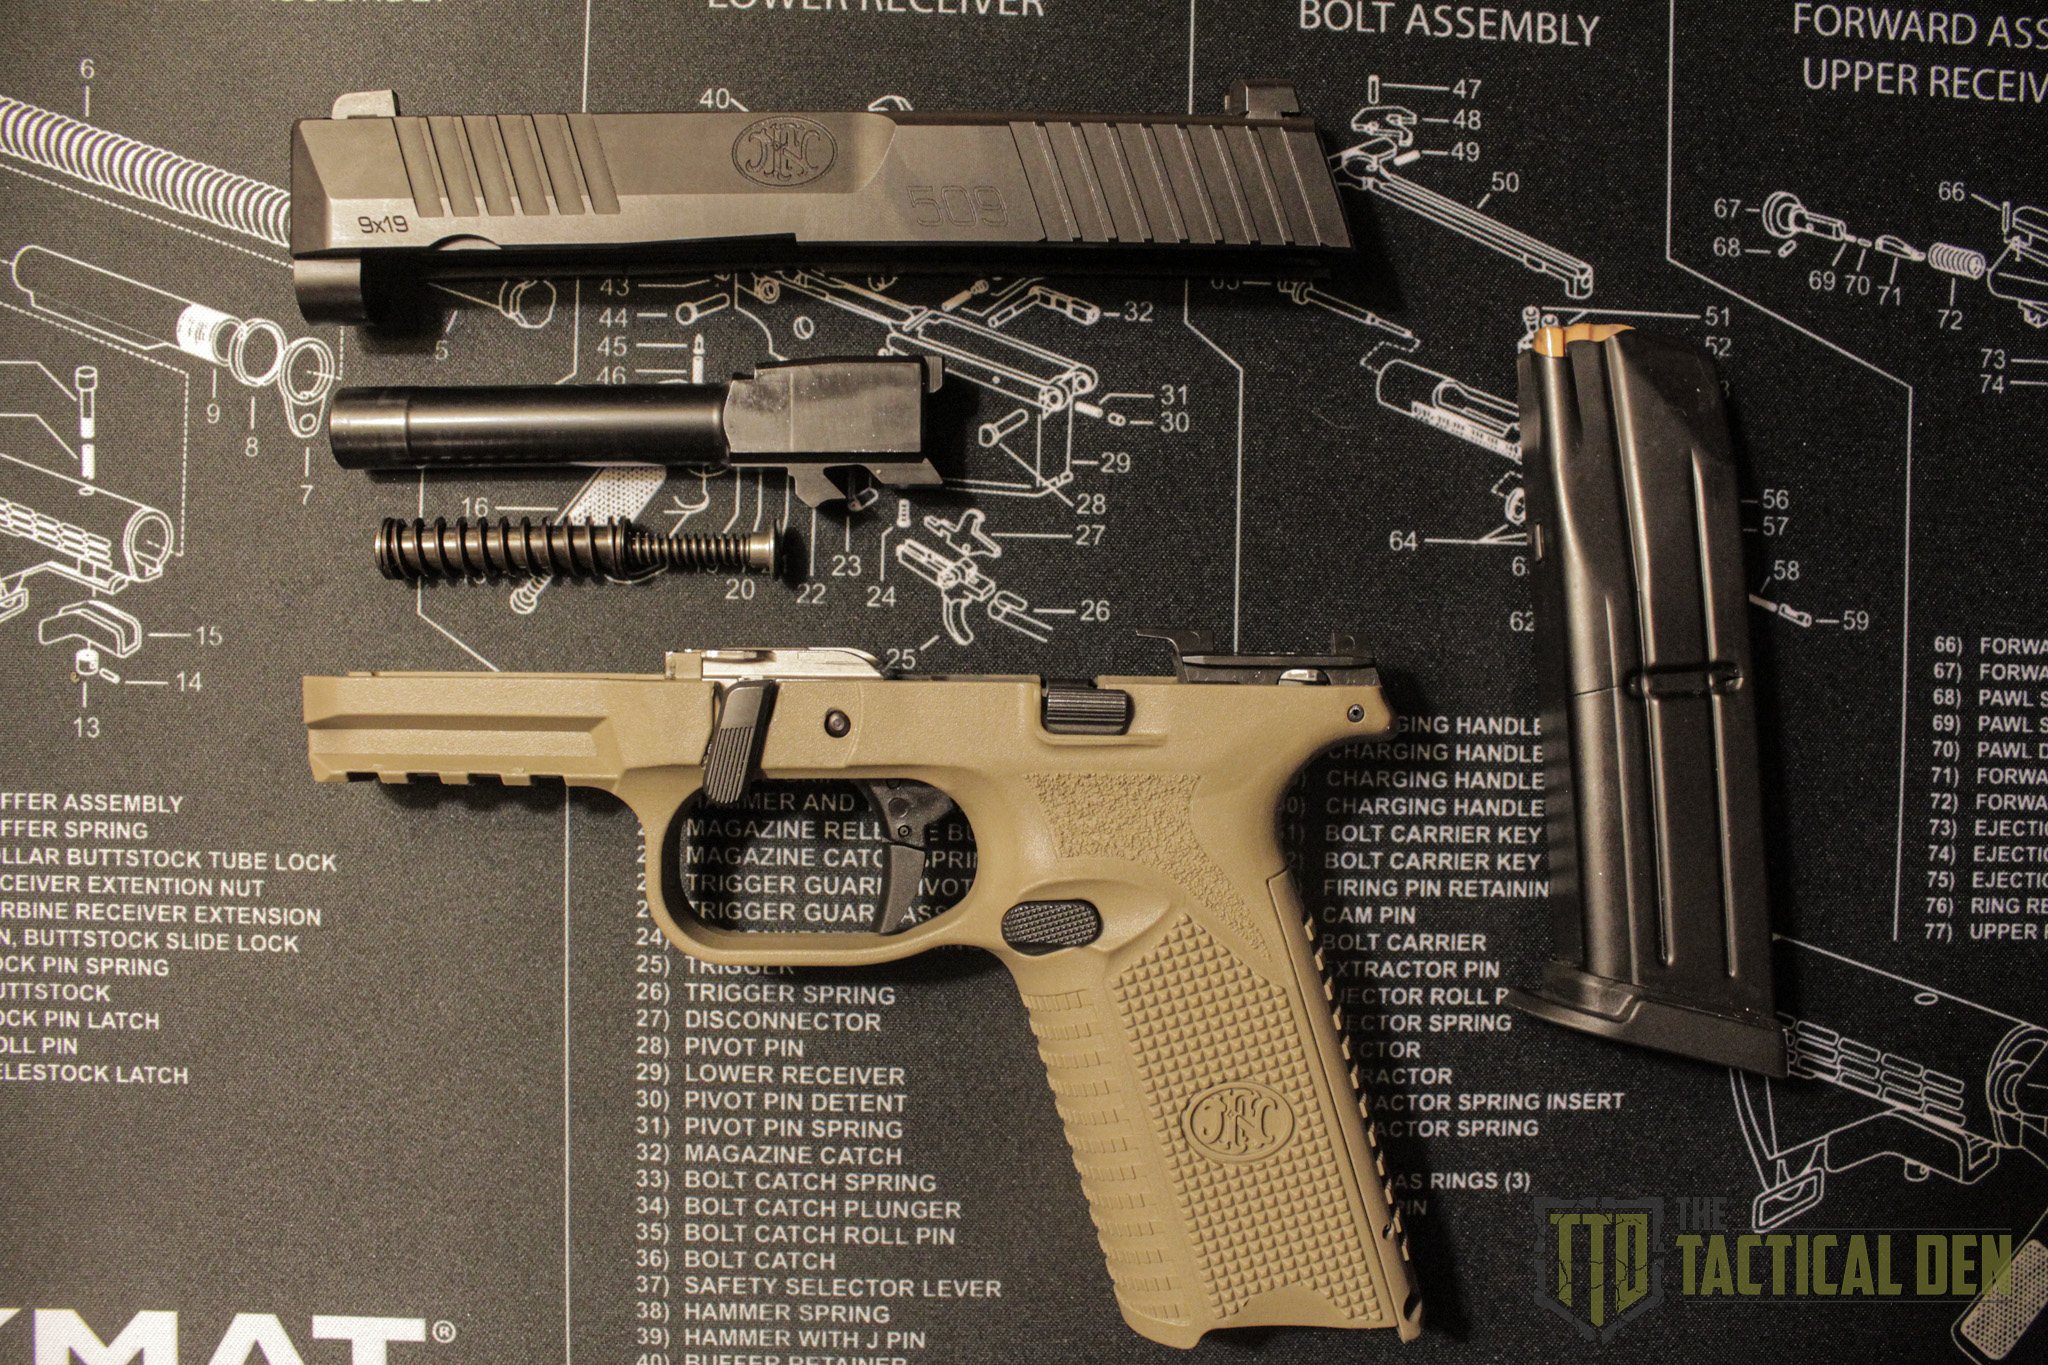
Field Stripping the FN 509
Before we jump into it, it’s crucial to follow the manufacturer’s instructions closely to safely and correctly field strip your FN 509, as safety is always our #1 priority when handling any firearm.
Clearing the Firearm: Start by removing the magazine and making sure the firearm is unloaded. It’s essential to pull back the slide and visually inspect the chamber to confirm that the firearm is completely unloaded. Safety should always be your #1 priority.
Locking the Slide: Next, retract the slide and use the slide stop to lock it in its rearward position.
Disengaging the Takedown Lever Down: Once the slide is locked in place, it’s time to flip the takedown lever down
Releasing the Slide: Now, hold the slide with one hand and release the slide stop with the other, easing the slide forward. Ensure not to let it slam forward to prevent any damage.
Releasing the Striker (Caution): At this point, it’s imperative to be extra cautious. The firearm MUST be unloaded to prevent any accidents. The slide will be slightly more forward than usual due to the takedown lever being disengaged. Pull the slide back just enough to align the rear of the slide with the rear of the frame. With the muzzle pointed in a safe direction, press the trigger to release the striker. This step is crucial and demands undivided attention to ensure safety.
Separating the Slide from the Frame: Having released the striker, you can now pull the slide forward, completely separating it from the frame.
Removing the Recoil Spring Assembly: Turn the slide upside down and remove the recoil spring assembly by grabbing the small spring on the recoil spring assembly and lifting up removing the assembly from the slide.
Removing the Barrel: Lastly, grab the lug of the barrel and lift it up and around the extractor, and slide it rearward out of the slide.
At this point, your FN 509 is successfully field stripped! This breakdown is sufficient to perform an efficient and effective cleaning, ensuring you can reach all the necessary areas for a thorough cleanup and lubrication.
Cleaning the FN 509
Before we dive into the lubrication process, we need to ensure every part of the FN 509 is squeaky clean. Here is my step by step routine while following FN’s Instructions.
NOTE: FN advises to not use any solvents on any polymer components of the FN 509.
Cleaning the Barrel
Begining with the barrel bore, applying Hoppes 9 cleaner using a q-tip. Allow it to sit for a few minutes to help loosen the debris. Then, take a bore snake (ensure it is the correct caliber, 9mm in this case) and insert it from the chamber end of the barrel, pulling it through several times to clean out the cleaner and any debris.
Now shifting my focus to the barrel exterior and the unlock surface. Use a q-tip to apply the cleaner evenly across the surface. Afterwards, wipe away the cleaner and any dirt using a clean patch.
Cleaning the Slide
Bringing our focus to the slide, using a q-tip apply the cleaner to all the metal surfaces. Pay attention to several critical areas: the front of the muzzle, the cartridge guide surface, the slide rails, the striker block, and the breach face. Next, apply cleaner to the exterior surface of the slide, using q-tips and cleaning patches wipe away any debris and cleaner from the exterior.
Recoil Spring Assembly
Moving onto the recoil spring assembly, wiping it down with a rag dampened with some cleaner to prepare it for reassembly later.
Cleaning the Frame
Next we will be taking care of the frame. Following FN’s guidance to avoid the polymer components with any solvents, apply the cleaner only to the metal surfaces, which include the front and rear slide rails, the unlock block, the sear, and disconnect cam .
Conclude with the grip and the mag well. Wipe away any debris present, while ensuring not to use solvents. If needed a multipurpose lubricant can be used to aid with wiping the mag well and grip down.
Now, with every component cleaned, we are set to start the lubrication process, ensuring the longevity and optimum function of our FN 509. Let’s move on to lubricating the different parts to maintain a well-functioning firearm.
Cleaning Supplies Used
The exact products and tools I used during the FN 509 cleaning process.
Hoppe’s 9 Lubricating Gun Oil
Keeps the FN 509 running smoothly and reliably by lubricating key wear points.
Proper lubrication is the next step in our maintenance routine. This step ensures a smooth operation and a long lifespan for your FN 509. Let’s jump right into it:
Lubricating the Barrel
Before I begin with the lubrication process, it is important to note that if you plan on storing your FN 509 for an extended period, applying a light coat of oil inside the barrel can be a good preventive measure against corrosion. However, remember that this oil needs to be removed before using the firearm again, as the presence of oil in the barrel can cause high pressures when shooting, potentially leading to catastrophic failure. Since I’m not storing my FN 509 for a long duration, I won’t be oiling the inside of the barrel this time.
I focus on the unlock surface and a quarter inch down from the muzzle. At these points, I apply a drop of oil each, using a Q-tip and a cleaning patch to spread the oil evenly around the whole exterior of the barrel, ensuring a light coat that provides both corrosion resistance and smooth metal on metal application.
Lubricating the Slide
Next up, I deal with the slide, applying a drop of oil at both ends of the slide rails, the cartridge guide, extractor, and the striker block. Holding the slide vertically helps the oil work its way from one end of the slide rails to the other, ensuring complete coverage. A Q-tip comes in handy to wipe away all excess oil and leave a light even coat of oil. (See Image)
Moving forward, I take a few drops of oil on a cleaning patch to wipe down the entire metal exterior of the slide, which assists in resisting corrosion. Then use a clean patch which will help in removing most of the oil, leaving behind a very light coat that doesn’t transfer to your hands when handling the weapon.
Lubricating the Frame
I then turn my attention to the frame, focusing on both slide rails and the unlock block. Here, it is important to remember the FN 509 has an ambidextrous slide stop, so oiling both sides is necessary for smooth functioning. Placing a drop of oil and using a Q-tip in these locations ensures a nice even light coat and the removal of excess oil.
As I near the end of the lubrication process, my focus shifts to the rear of the frame. Key areas to focus here are the sear, both slide rails, and the disconnect cam. A drop of oil on each part and a Q-tip to spread it evenly makes sure everything runs smoothly without any excess oil remaining.
With the FN 509 now cleanly lubricated, we are ready to move onto the reassembly process. Ensure a fine balance in oil application to maintain a well-lubricated yet not over-oiled firearm, ready for smooth operation during your next use.
Reassembling the FN 509
After thoroughly cleaning and lubricating your FN 509, it is time to reassemble the firearm.
Installing the Barrel: Begin with the slide turned upside down. Hold the barrel by its lug and slide the muzzle end first through the hole at the front end of the slide. Then slide it back toward the breach face until it fits snugly in its original position.
Installing the Recoil Spring: Next, grab your recoil spring assembly, placing the larger end into the designated recess at the front of the slide. Compress the spring slightly to let the recoil spring guide settle into the notch on the barrel lug, ensuring it is properly seated.
Reuniting the Slide and Frame: Carefully guide the slide back onto the frame’s slide rails. Slide it all the way back to the rear-most position and utilize the slide stop to lock it in place. Now, flip the takedown lever back to its upward position, which effectively locks the slide to the frame.
Final Checks: Release the slide by pressing down the slide stop, permitting the slide to travel forward. It’s important to conduct a functions check at this stage. Test the trigger, slide stop lever, and magazine release to make sure everything is working correctly.
Remember safety always comes first. Always confirm that your firearm is unloaded before starting the reassembly process. Following these instructions carefully will ensure that you have a well-maintained firearm, primed for use once again.
Cleaning Supplies Used
The exact products and tools I used during the FN 509 cleaning process.
Hoppe’s 9 Lubricating Gun Oil
Keeps the FN 509 running smoothly and reliably by lubricating key wear points.
As we wrap up this step by step guide on field stripping, cleaning, and lubricating your FN 509, it’s essential to highlight the importance of regular maintenance for the optimal performance and longevity of your firearm. Here we’ll address some final points and frequently asked questions:
The Importance of Regular Maintenance
Maintaining your firearm is not just about cleaning it after use but ensuring it operates correctly each time. It helps in:
Ensuring Safety: Regular maintenance ensures the safety of the user and others around them.
Longevity: It extends the lifespan of the firearm, providing a smooth operation for years to come.
Performance: A well-maintained firearm will perform at its peak, giving you accuracy and reliability each time you use it.
How Often Should You Clean Your FN 509?
A common question is how often a firearm should be cleaned. While it largely depends on its usage, a good rule of thumb is:
After Each Use: Cleaning after each use is advisable, especially if you’ve fired a considerable number of rounds.
Periodic Checks: Even if not in regular use, a periodic check and cleaning every 3-6 months is beneficial to prevent any issues due to storage conditions.
FAQs
What is Field Stripping?
Field stripping is a firearm terminology for the act of disassembling a firearm to the greatest possible extent without the usage of any extra tools.
Can I use a different cleaner or oil?
Yes, you can use different cleaning solutions and oils. However, always ensure they are designed for use with firearms to avoid any damage.
What if I am unable to reassemble the firearm?
If you find difficulty in reassembling your FN 509, refer back to the manufacturer’s guide or consult with a professional gunsmith for assistance.
Is it necessary to clean the firearm even if it has not been used?
Yes, it’s advisable to clean it periodically, as oils can dry out and dust can accumulate, potentially causing functionality issues down the line.
Final Thoughts
In conclusion, understanding and following the proper steps in field stripping, cleaning, and lubricating your FN 509 not only ensures the safety and efficiency of your firearm but also enhances its lifespan. Remember that this routine should be as familiar to you as operating the firearm itself. To view our full in-depth review on the FN 509 Click Here!
Thank you for following along in this detailed walk-through. Remember always to prioritize safety in every step and to refer to the manufacturer’s guidelines for the best results. Stay safe and happy shooting!
Danny Lux is the founder of The Tactical Den, where he specializes in firearms reviews, AR-15 builds, optics, hunting rifles, and firearm accessories. Through hands-on testing, detailed build guides, and real-world experience, Danny helps shooters find the best gear for their needs without the marketing hype.


Leave a Reply