
Please note that some of the links on this site are affiliate links and we earn from qualifying purchases. This does not cost you anything extra, but it helps us keep the lights on. Thank you for your support!
In this guide, we’ll take you step-by-step through the process of field stripping, cleaning, lubricating and reassembling of your Glock 19. Our focus is to provide you with clear instructions that will help you confidently maintain your firearm, whether you’re a seasoned owner or new to the world of Glock. The Glock is one of the most popular and reliable firearms in the world. Known for its simplicity the Glock 19 makes this process straight forward and user friendly.
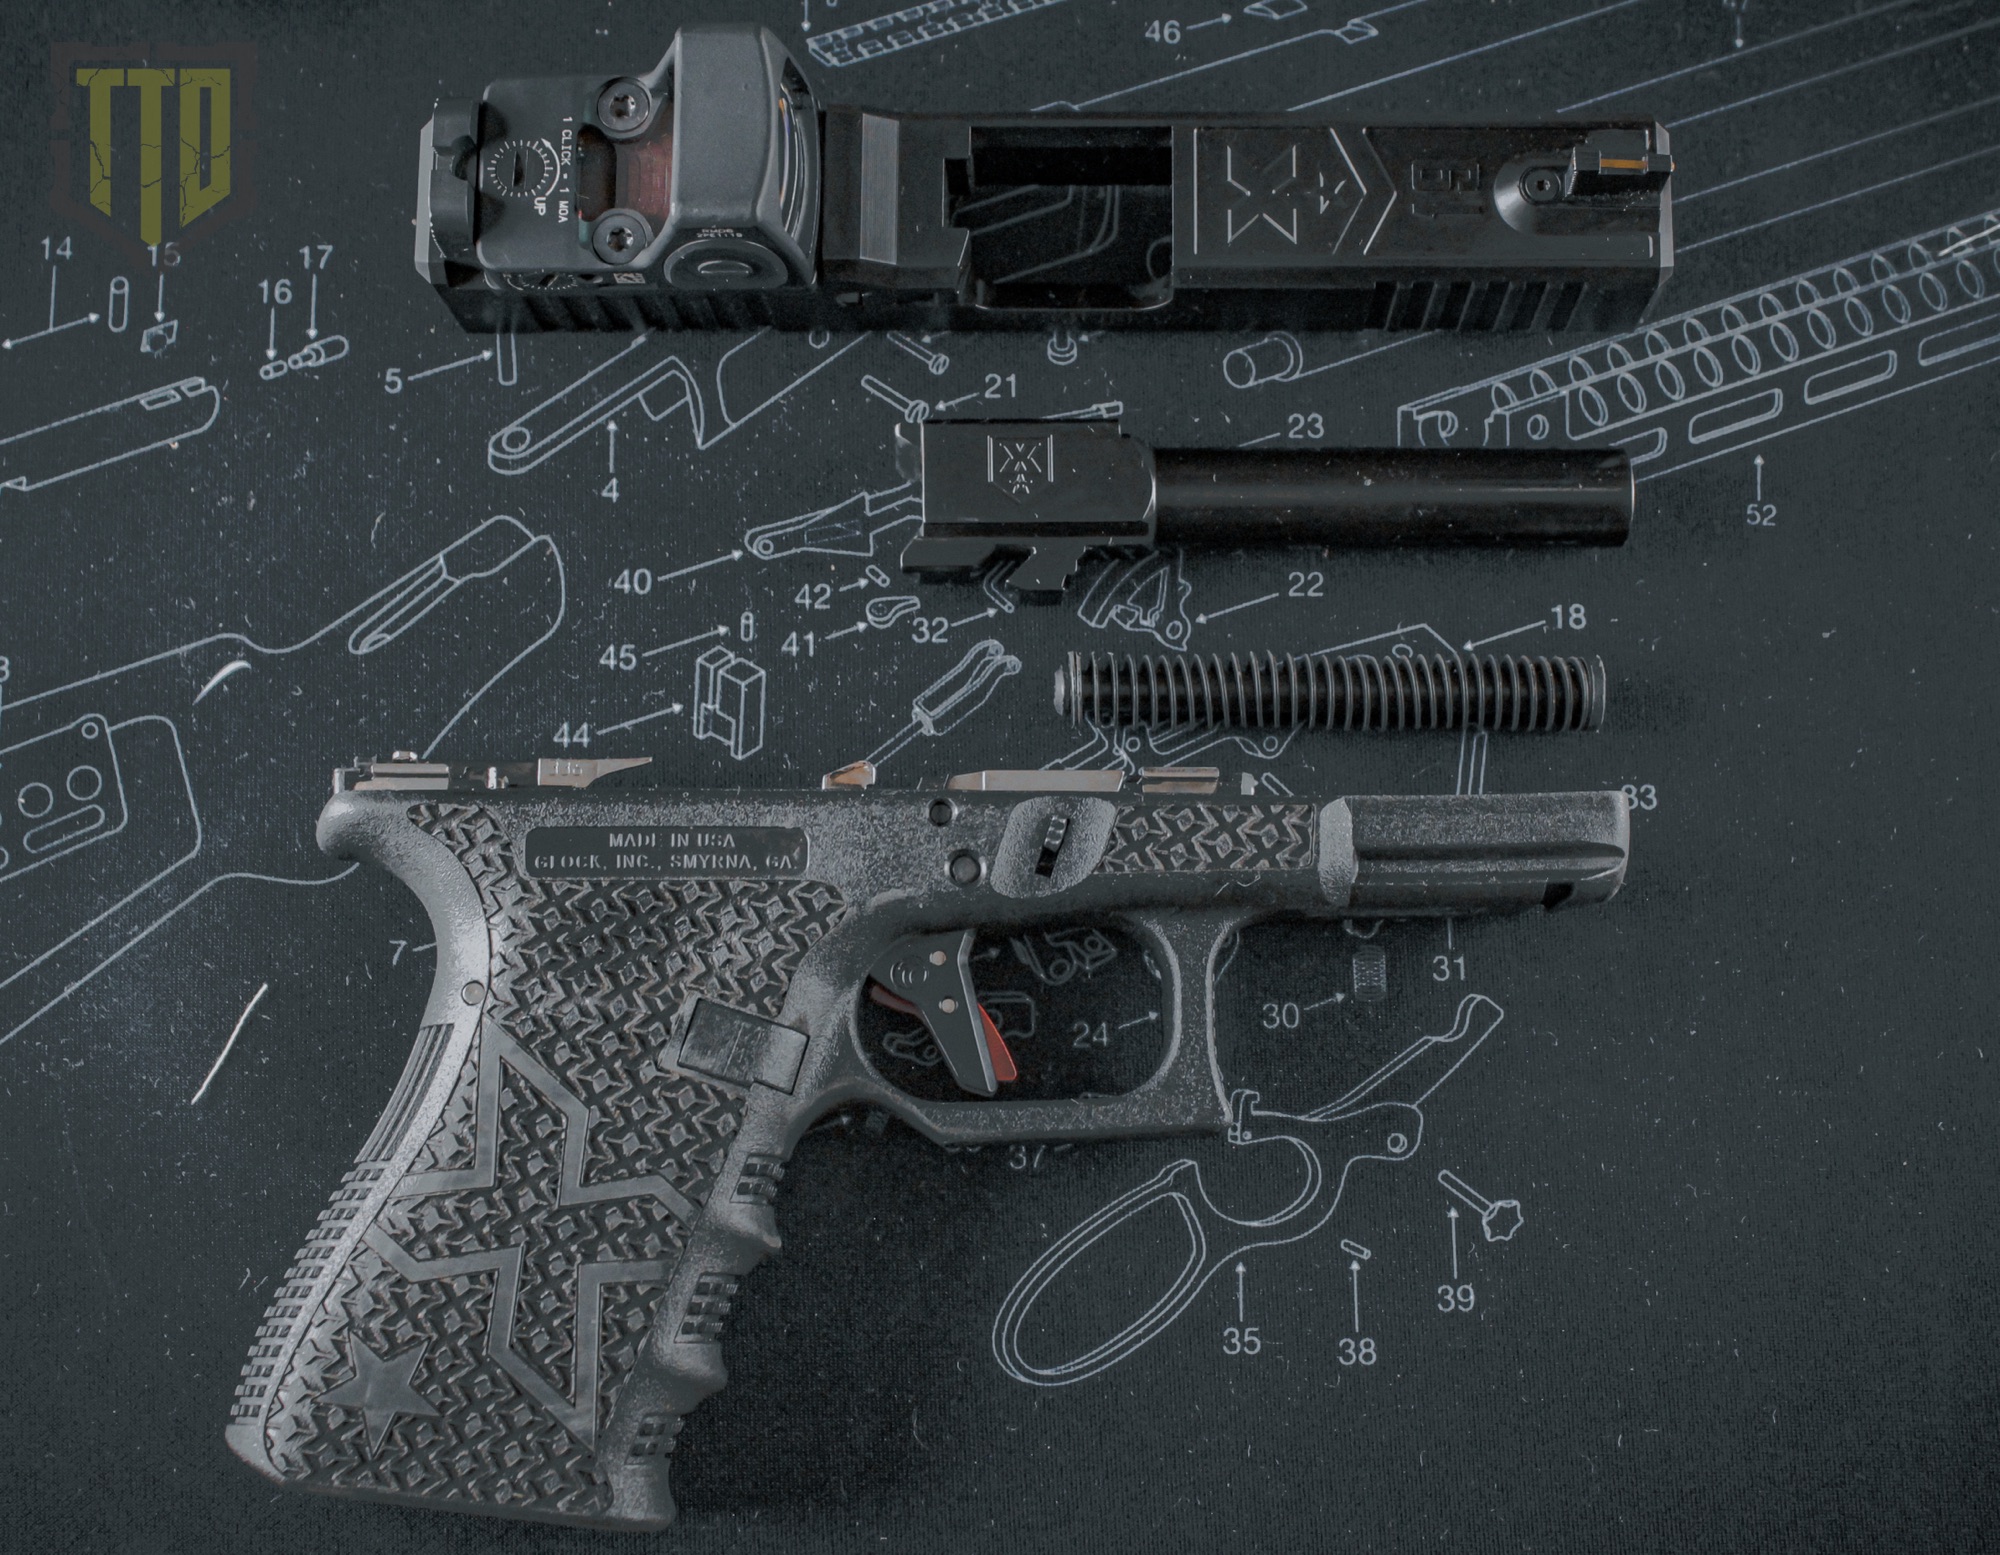
Today, we’ll be using the AccuracyX AXE-19, a custom Glock 19 by AccuracyX, to demonstrate the maintenance process. While the AXE-19 features some custom enhancements, the fundamental aspects of field stripping, cleaning, and lubricating remain consistent with the standard Glock 19. For our Full Review of the AccuracyX AXE-19 Tactical Click Here! Its a good one!

Before we jump right into this guide I want to take some time to touch on firearm handling and safety. As safety is always our number one priority when handling firearms.
Handling Firearms Safely
Safety is should always be your number one priority when handling any firearm, including the Glock 19. Here are essential safety tips:
- Assume It’s Loaded: Always treat the firearm as if it’s loaded.
- Muzzle Awareness: Keep the muzzle pointed in a safe direction, away from yourself and others.
- Finger Discipline: Keep your finger off the trigger until you’re ready to shoot.
- Check Your Surroundings: Be aware of your target and what’s beyond it.
- Unloading: Always ensure the firearm is completely unloaded before maintenance – remove the magazine and check the chamber.
Preparing Your Workspace
Setting up a safe and effective workspace is crucial for firearm maintenance:
- Choose a Well-Lit Area: Good visibility is key.
- Clear, Clean Surface: Work on an uncluttered surface.
- Separate Ammunition: Keep ammunition away from your cleaning area.
- Ventilation: Ensure good air circulation, especially when using solvents.
- Safety Gear: Consider safety glasses and gloves, depending on your cleaning materials.
Adhering to these safety precautions helps prevent accidents and ensures a safe maintenance experience.
Tools and Supplies Needed
For the maintenance of your Glock 19, it’s essential to have the right tools and supplies. Here’s a list of what we’ll be using:

- Bore Solvent: We like to use Lucas Bore Solvent.
- Cleaner, Lubricant, and Protectant (CLP): again Lucas CLP is our preferred choice.
- Gun Oil: FP-10 Lubricant is specifically recommended for the AXE-19 by AccuracyX, and we’ll be using it in our guide.
- Boresnake or Cleaning Rod: A Boresnake is my go to for its simplicity and ease of use, but a cleaning rod is also suitable.
- Gloves: Protect your skin from solvents.
- Q-tips: Ideal for reaching those tight areas.
- Toothbrush: Useful for scrubbing away tough carbon buildup.
- Gun Cleaning Patches: Necessary for applying solvents and oils and for wiping down parts.
- Firearm Mat: Protects both your work surface and the finish of your firearm.
These are our supplies we’ll be using and the brands we like to use. We’ve used multi brands in the past and Lucas and Shooters Choice are our favorites.

Unloading/Clearing
Before we start field stripping the Glock 19 down, we need to make sure it is unloaded and safe to work on. You can do this by following the steps below:
Removing the Magazine
- Begin by removing the magazine from your Glock 19 by pressing the magazine release button to release it.

Clearing the Chamber
- Hold the pistol firmly with one hand, keeping your finger away from the trigger. With your other hand, grasp the rear serrations of the slide and pull it back sharply. This action should eject any round that might be in the chamber.

Locking the Slide
- Next, lock the slide in its rear-most position by engaging the slide stop lever while the slide is fully pulled back.

Inspecting the Chamber and Magazine Well
- With the slide locked rearward, visually and physically inspect the chamber and the mag well. Ensure that there is absolutely no ammunition remaining in either area. This step is vital for safety.

Releasing the Slide
- Once you’ve confirmed the firearm is unloaded, release the slide to return it to the forward position. You can do this by either pressing the slide stop lever down or pulling the slide back and releasing it slide forward.

Disengaging the Trigger
- The final step before you start the actual field stripping is to disengage the trigger. Point the muzzle of your Glock 19 in a safe direction and pull the trigger. This step is necessary for disassembly.

Field Stripping
With your Glock 19 safely unloaded you’re now ready to field strip it for cleaning. The steps for this process are as follows:
Preparing to Remove the Slide
- Grip your Glock 19 with your firing hand. Ensure your fingers are placed over the top rear of the slide, just in front of the rear sights. Your thumb should rest on the back end of the frame.
- Use your fingers to retract the slide approximately an eighth of an inch. Be cautious not to pull the slide back too far as this will re-engage the trigger, needing another trigger pull.

Removing the Slide
- While maintaining the slide in its slightly retracted position, use the thumb and index finger of your non-firing hand to pull down the slide lock (located on both sides of the frame) evenly.

- With the slide lock disengaged, continue to hold it down and then push the slide forward, off the frame of the firearm.

Removing the Recoil Spring and Barrel
- Flip the slide upside down. Squeeze the end of the spring assembly with your thumb and compress it slightly, then lift and pull it out to remove it.

- Next, grip the barrel by the barrel locking cams. Slightly lift it and push it toward the front of the slide, then lift it up and out towards the rear.

Your Glock 19 is now fully field stripped and ready for the cleaning and lubrication process. It’s important to handle each component with care and keep them organized for easy reassembly.

Cleaning the Glock 19
Cleaning your Glock 19 is essential for its performance and longevity. Each component should be cleaned thoroughly, I like to start with the barrel and moving on to other parts.
Barrel
- Apply bore solvent to the bore of the barrel and allow it to soak for a few moments to loosen residue.

- Next, we will grab our boresnake or rod and pass it through the barrel, starting from the chamber end. Repeat a few times until all residue and debris are removed.

- Run a patch soaked in CLP through the bore of the barrel. This helps remove any remaining residue.

- If storing the firearm for an extended period, leave CLP inside the barrel. If you plan to use or shoot the firearm soon, make sure to remove excess oil from the bore by passing a clean patch through the bore until dry.
Barrel Exterior
- Using a cleaning patch and Q-tips coated in CLP, thoroughly wipe down the exterior of the barrel.

- Continue this process until the patches come out clean. Then with a clean patch remove all cleaner and residue from the surface.
Slide
- Start by using a toothbrush, Q-tip, or cleaning patch with CLP to clean the rail cuts in the slide. Continue cleaning until no residue is left.

- While holding the slide with the muzzle end facing downwards, use the toothbrush or Q-tip with CLP to clean the breach face and area under the extractor claw.
- Wipe all cleaned areas with a patch to ensure no cleaner residue remains.

- Examine the slide for any dirt or debris and clean using CLP and a toothbrush, Q-tip, or cleaning patch, if necessary.

- Wipe down the exterior of the slide with CLP until the patches come out clean and free of residue. Remove all cleaner from the slide with a clean patch.
Frame
- Use a cleaning patch or Q-tip soaked in CLP to wipe down the exposed parts of the frame, focusing on the trigger area and the rear part of the frame.


- Repeat as necessary until the cleaning patches come out clean. For those tough to reach areas a Q-tip is recommended.
Following these steps will ensure your Glock 19 is thoroughly cleaned and ready to be lubricated.
Lubricating the Glock 19
Proper lubrication is key to ensuring smooth operation and preventing wear and tear on your Glock 19. After cleaning each part, follow these steps to lubricate your firearm.
Barrel
- Apply a few drops of FP-10 or Lucas gun oil to the outside of the barrel, focusing on the barrel hood, lugs, muzzle end, barrel hood and any other areas where metal-to-metal contact occurs.


- Using your glove or a clean patch spread the oil around the barrels exterior leaving a light coat of oil. Be sure remove any excess oil.
Slide
- Apply a drop of Lucas gun oil or FP-10 inside the top of the slide, specifically in front of the ejection port where the barrel hood rubs against the slide.

- Lubricate the opening through which the muzzle end of the barrel slides in and out while cycling.
- Apply Lucas gun oil or FP-10 along the entire length of each slide rail cut.

- Use a cleaning patch lightly dampened with oil to gently wipe the exterior surfaces of the slide. Lastly with a clean patch remove any excess oil from the slide.

Frame
- Place a drop of Lucas gun oil or FP-10 where the rear end of the trigger bar touches the connector, located at the rear corner of the frame, the 4 slide rails and any other moving metal parts. Using a clean patch remove any excess gun oil.


Following these lubrication steps will help ensure that your Glock 19 operates smoothly and reliably, reducing friction and wear on its moving parts.

Final Inspection Before Reassembly
Before reassembling your Glock 19, it’s important to conduct a final inspection of all its parts. This ensures that everything is in good condition and functioning properly. Follow these steps for a thorough inspection:
External Inspection
- Check the frame and slide for dirt, grime, or visible damage.
- Pay close attention to the sights, trigger, trigger safety, slide stop, magazine catch, and extractor.
Barrel Inspection
- Look for dirt, leading, bulges, cracks, or obstructions in the barrel.
Firing Pin Safety Test
- Hold the slide and pull the lug of the firing pin to the rear, then let it move forward until it stops.
- Press the lug forward with moderate force (5 to 8 pounds). The firing pin should not move past the safety and protrude from the breach face of the slide.
Firing Pin Check
- With the muzzle end down, press the firing pin safety into the slide. The firing pin should move downward, and its tip should protrude from the breach face.
- Depress the firing pin safety and shake the slide. You should hear the firing pin move freely in its channel.
Extractor and Ejector Inspection
- Look across the breach face and check the extractor for cleanliness and ensure the claw is not broken.
Slide Stop Lever Test
- Pull the slide stop lever upward and release it. It should snap back sharply into place. If it’s sluggish or stays up, check its cleanliness or consult a Glock gunsmith.
Magazine Inspection
- Examine the magazines for dirt or visible damage.
- Pay special attention to the feed lips and magazine followers. Press down on the follower and release it; it should move freely without sticking.
After completing this inspection, you can be confident that each part of your Glock 19 is in good condition and ready for reassembly.
Reassembly of the Glock 19
After thoroughly cleaning and inspecting your Glock 19, it’s time for reassembly. Follow these steps to ensure a proper and safe reassembly process:
Installing the Barrel and Recoil Spring Assembly
- With the slide turned upside down, hold the barrel by the barrel locking cams. Insert the barrel into the slide muzzle end first, then slide it back and let it drop down into place.

- Place the small end of the recoil spring assembly into the indentation at the front of the slide. Press the other end of the spring with your thumb, compressing towards the front of the slide. Then push it down until the larger end of the recoil spring rests and locks into the notch on the barrel locking cams.

Installing the Slide onto the Frame
- Hold the frame with your firing hand, finger off the trigger and outside the trigger guard. Next, place the slide on top of the frame lining up the front rails with the rear of the slide.

- Push the slide rearward along the frame until you hear the slide lock snap, securing the slide into place.

Your Glock 19 is now fully reassembled. After reassembly, it’s highly recommended to conduct a function check.
Function Check
This check will confirm the proper operation of key functions and features.
Trigger Safety Test
- Make sure the firearm is unloaded and pointed in a safe direction.
- Press the trigger safety (the middle portion of the trigger) without pressing the trigger itself. The trigger should not move.
- Next, press the trigger including the trigger safety. The trigger should move smoothly.
Trigger Reset Test
- Again, ensure the firearm is unloaded and pointed in a safe direction.
- Pull the trigger and hold it down.
- While holding the trigger, pull the slide back and release it to reset the trigger.
- Slowly release the trigger until you hear a click, indicating the trigger has reset.
Slide Lock Test
- Insert an empty magazine into the firearm.
- Pull the slide back and release. The slide should stay open, indicating the slide lock is engaging correctly with the magazine’s follower.
- Remove the magazine using the mag release
- Using the slide lock, release the slide.
Performing these tests ensures that your Glock 19’s safety mechanisms and features are intact and operating as expected. If any function does not perform as described, it’s advised to consult with a professional gunsmith or contact Glock for further assistance.
Conclusion and Final Thoughts
Having completed the field stripping, cleaning, lubricating, reassembling, and function checking of your Glock 19, you’ve taken a significant step in ensuring the longevity and reliability of your firearm. Regular maintenance not only preserves the condition of your Glock but also familiarizes you with its mechanics and features, enhancing your skill and confidence as an owner and operator.
Remember, the key to maintaining any firearm is consistency and attention to detail. Each step, from disassembly to reassembly, plays a crucial role in the overall functioning of your Glock 19. Regular cleaning after use, coupled with periodic detailed maintenance, will keep your Glock in optimal condition.
If you have any questions or concerns during your maintenance process, don’t hesitate to seek professional advice. Now, let’s address some frequently asked questions:
FAQs
- How often should I clean my Glock 19?
- Clean your Glock 19 after every use and conduct a thorough maintenance check every few months, depending on usage.
- Can I use any gun oil for my Glock 19?
- It’s recommended to use high-quality gun oils, like FP-10 Lubricant or Lucas gun oil. However, ensure it’s suitable for your specific model, especially for custom versions like the AXE-19.
- What should I do if a part of my Glock 19 seems damaged during inspection?
- If you find any damaged components, it’s best to contact a professional gunsmith or Glock service center for repair or replacement.
- Is it necessary to lubricate my Glock 19 even if I don’t use it often?
- Yes, even if not used frequently, your Glock should be cleaned and lubricated periodically to protect it from rust and corrosion.
- How do I know if I’ve reassembled my Glock correctly?
- A successful function check, as outlined in the previous section, is a good indicator. If you have any doubts, consult a professional.
To see our last post Click Here: AccuracyX AXE-19 Tactical, Is It The Ultimate Glock 19? Full Review!!!


Leave a Reply